Whether you want to prepare your files for print or you’d prefer our expert PrePress team prepare it, we’re here to help. If you’re ready to send your files, you can upload them now. If you want to save time during the process, or just learn something new, follow the guide below when setting up your files.
Raster Files vs Vector Files
What is a raster file?
Raster images contain a set number of pixels. Pixels are a fixed number of colored squares that make up your image. When a raster image is stretched to fit into a space they were not designed to fill, the pixels become visibly grainy and the overall image gets distorted. A raster image can be enlarged by either adding more pixels or enlarging the pixels, but doing so may result in serious quality issues.
![]()
What raster file types does Tectonics accept?
We accept jpg, jpeg, tif, psd and pdfs originating from raster files.
When should I use a raster file type?
Raster files are used for photos. In your print if you have a lot of photography, you would use a raster file. When choosing photos it’s important to remember that the resolution is what decides the print quality. You will want to have a high resolution image in order to ensure that your art will print at a good quality. Photos are made up of pixels and in an image there is a set number of pixels, so dramatically resizing an image may compromise its quality. You cannot add pixels to your image to improve quality.
What is a vector file?
A vector file is made up of data points and lines rather than pixels. The points and lines allow the image to be dramatically resized without sacrificing quality. This is because the vector images use mathematical formulas to construct images rather than pixels, making them more flexible to scale for size with no loss of quality.
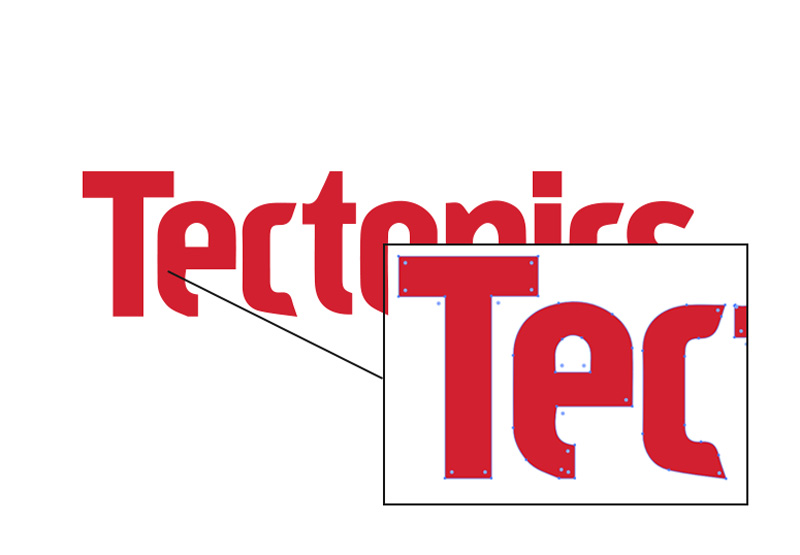
When you’re ready to deliver your files, you’ll want to make sure to outline all text. To create outlines in Illustrator:
-
-
- Select the text that needs to be outlined
- In the top menu, select “Type”.
- In the drop-down menu, select “Create Outlines”
-
This will change your text from a font to data points with connecting lines, providing scalability and eliminating the need for you to send the font itself as a separate file.
What vector file types does Tectonics accept?
We accept ai, eps, and pdf’s originating from vector files.
When should I use a vector file type?
Vector files should be used whenever possible in large format prints because of the ability it provides to infinitely resize your art. Since vectors are made up of data points connected by lines rather than square pixels, the quality of your print will not change even when it’s dramatically resized.
Resolution
Resolution is the amount of pixels in an image, which plays a part in determining the quality of your print. It is defined by ppi (pixels per inch) and or dpi (dots per inch).
When it comes to file preparation of large-format banner printing, there’s a different method of thinking involved when setting up your files. The traditional rules of file dimension and resolution used in standard offset printing don’t necessarily apply. Where traditional print methods have you working in the 300 dpi range, large format reverses that thinking altogether. This is where a number of traditional print designers and desktop publishers find themselves in unfamiliar territory. There’s a common misconception that bigger files need more resolution than normal print jobs, but this is simply not true.
Preparing files for Large Format Printing does not usually require the higher 300 dpi image files commonly associated with other printing methods. The word “large” just implies that. 300 dpi images at large sizes can produce extremely large files – in the Gigabytes range. This is usually not necessary and places an extra burden on all raster image processing systems (RIPs). When setting up your file, it is better to make images at full size (the size of the printed product), unless it’s larger than 150”. It is only necessary to set the pixel size at 100 pixels/inch for most large format files set at 100% scale.
Scale
When it comes to file preparation of large-format printing, there’s a different mode of thinking. The traditional rules of file dimension and resolution used in standard offset printing don’t necessarily apply. Where traditional print methods have you working in the 300 dpi range, large format basically reverses that thinking altogether. This is where a number of traditional print designers and desktop publishers find themselves in unfamiliar territory. There’s a common misconception that bigger files need more resolution than normal print jobs – this is simply not true. All this does is give you a really huge file size.
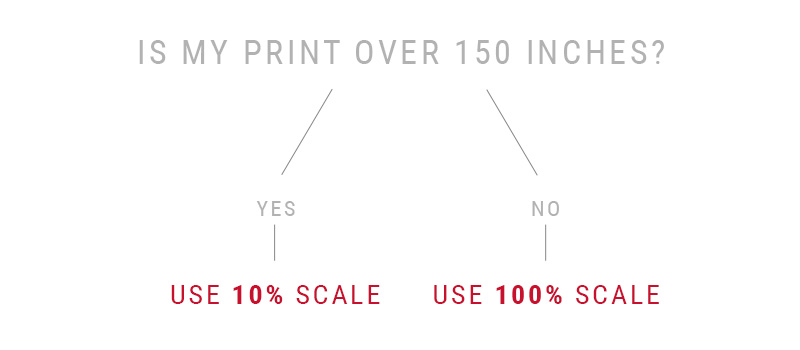
Preparing files for large format printing does not usually require the higher 300 dpi image files commonly associated with other printing methods. 300 dpi images at large sizes can produce extremely large files in the gigabyte range. This is usually not necessary, and places extra burdens on all raster image processing systems (RIPs). You will find a wide range of opinions when researching this subject. When setting up images with the document size set at full size (the size of the printed product) it is only necessary to set the pixel size at 75 dpi for most types of banners. If the actual printed size is over 150”, then you can set your document size to 10% of actual print size to optimize file sizes.
100% Scale
At 1/1 scale or 100% sizing, your resolution can be set to 75 dpi. For example, if your final print needs to be 125” by 100”, you would set your file to 125”x100” with a 75 dpi resolution setting. Viewing these files at actual size on your screen can be helpful in previewing print quality, but be sure to calibrate your monitor’s “print size” settings in Photoshop or Illustrator first or else the preview will be inaccurate. When done properly, an inch on screen will match an inch on a ruler held up to the screen.
10% Scale
If your print is going to be over 150”, you should set your file up at 10% scale. In this instance, if your final print needs to be 300” by 100”, you would set the dimensions of your file to 30”x10”. For your resolution, you’ll increase the standard dpi of 75 by 100% and set the file up with a 750 dpi resolution. An easy rule of thumb is to move the decimal one spot to the left in your file dimensions, and one spot to the right in your dpi.

The quality of your print will not change with the difference in scale, but it enables you to have a smaller, more manageable file size to work with.
Color
Color is an important component in understanding how to set up your files for large format printing.
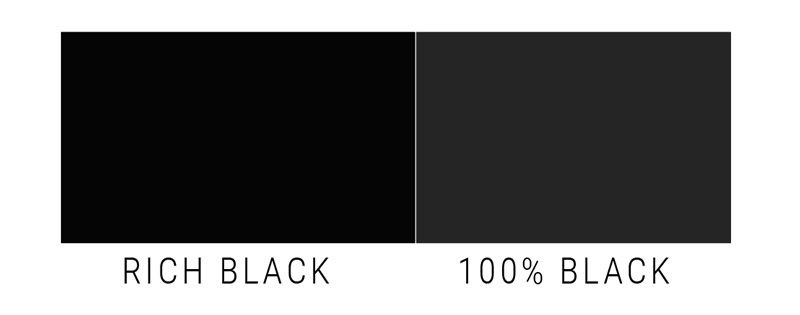
Rich Black
When using larger areas of black, use Rich Black instead of Standard 100% Black. Rich Black is CMYK 5OC, 5OM, 5OY, 1OOK. When graphic designers “Fill with Black”, Photoshop fills your selected area with only black ink (100% K). Rich Black contains elements of other colors to produce a darker, more saturated true black.
CMYK, PANTONE, RGB
The easiest way to imagine how color works is to think of your color as paint buckets. CMYK is a combination of the four colors that mix together in order to create your one desired color. Pantone can be thought of as one pre-mixed color. They’re used to ensure that your color is the same at all times. RGB is a mixture of the red, green, and blue used for web.
What is CMYK and when do I use it?
CMYK colors are made up of cyan, magenta, yellow, and black. They combine the four colors in order to create your desired color. CMYK colors are used for printing, as the ink in the printers are cyan, magenta, yellow, and black. Anytime you are creating a print from a digital file, you will want to send your file to the printer in CMYK.
What is RGB and when do I use it?
RGB colors are made up of red, green, and blue. RGB colors are typically used for web or anything being viewed on a screen. These are not printing colors.
What is Pantone and when do I use it?
Pantone (PMS) colors give you the ability to have one true, specific color. Pantone colors are often used in a corporate branding. Pantone colors give companies the ability to have consistent, recognizable branding. They can choose their Pantone colors and ensure consistency in all prints, making it recognizable to customers.
Can Tectonics match my Pantone Colors?
With our extensive color management capabilities, Tectonics is capable of matching most Pantone colors. In order for Tectonics to PMS color match, you need to make sure that all of the elements within the art file are tagged with the particular PMS color that is needed. By selecting and filling the element with the requested PMS color, Tectonics Prepress team knows that this requires attention. Once the Tectonics team sees this within the file, the team will call it out on the graphic proof for your approval.
Bleed
Bleed is something you should be generous about. All art files should have 2” of bleed on all sides. For example, if your finished size is 48” x 36”, the dimensions in the file you send to Tectonics with bleed markings would be two inches larger than that all around. In this example, the dimensions in your file with bleed would be 52” x 40”. In starting with your 48” x 36” dimensions, you add 2” to the left, 2” to the right, 2” to the top, and 2” to the bottom for a resulting dimension of 52” x 40”.
This extra amount of art around the perimeter of the provided artwork is present in case it is needed for sewing adjustments and/or fitting purposes, and to ensure there are no unprinted edges in the finished product.
Strike Off’s
What are strike off’s?
A strike off is a sample of material that has been printed to your requirements, so that you can verify colors and image quality before approving the full order.

When do I use strike off’s?
It is completely up to you whether or not to use strike off’s. If you are curious about how a certain section of your artwork is going to look printed at 100% or on a particular material, a strike off helps provide a preview of what a full print would look like.
Sending Tectonics Your Files
Ready to send us your files? Please include the following with your order:
- Accurate color hard-copy for reference
- Pantone colors that need to be matched
- Please note, some Pantone colors may fall outside the process color gamut
- Matching Pantone colors may affect your turnaround time
- Layout sheet in hard-copy or PDF form. Your layout sheet should include finish size, crops, finishing information, and any other information needed to complete your job

Have a question?
We’re here to help. Let us know what you need, and we’ll get you a solution.
Get in Touch
"*" indicates required fields
You May Also Like